In this article, I teach you computer typing lessons. Today we learn about Microsoft Office Word.
Many times we need to create documents for different purposes, it may be for resumes, projects, etc...There are several questions are asked on Microsoft Office Word in the GCC TBC exam.
In this article, I will tell you each and every feature of Microsoft office word.
- File Menu
- Insert Menu
- Page Layout Menu
- References Menu
- Mailing Menu
- Review Menu
- View Menu
- Add-Ins Menu
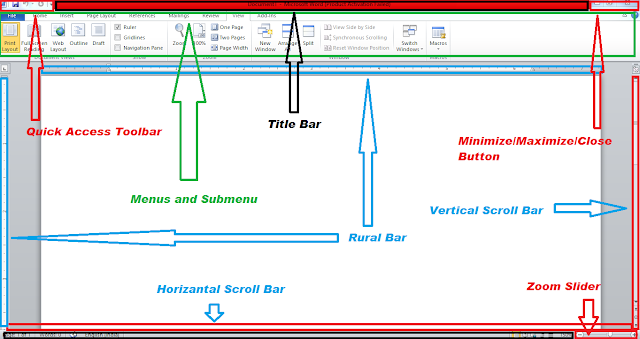
First up all I will give you a basic overview of Microsoft Office Word. There is a Title bar present at the top of the MS Word.
A quick access toolbar is present at the top left corner of the MS Word window. There is Minimize, Maximize and close button at the right top corner of the MS Word window. The status bar is present at the bottom of the MS Word window above the taskbar of the computer. At the right and bottom sides, there is a vertical and horizontal scroll bar. There is a Rural bar present at the top and left the side of the MS Word window.
A quick access toolbar is present at the top left corner of the MS Word window. There is Minimize, Maximize and close button at the right top corner of the MS Word window. The status bar is present at the bottom of the MS Word window above the taskbar of the computer. At the right and bottom sides, there is a vertical and horizontal scroll bar. There is a Rural bar present at the top and left the side of the MS Word window.
Different bars in the Microsoft Office Word is are as follows:
Let's talk about Menus in Microsoft Office Word.
File Menu:
File Menu is one of the most important menus in Microsoft Office Word. The commands available in the File menu are Save, Save as, Open, Close, Info, Recent, New, Print, Save and send, Help, Options and Exit.
Let's talk about the Function of Each Option in Detail. The save option is used to save the document on a computer hard disk. The save as function is used when we have to save the document with a different name. The open option is used to open an already saved file in MS Word. The close Option is used to close the document in MS Word. If you want to know information about the document then the Info option is used. In the Recent Option, all recent files are shown. If you want to create New file then New Option is used. The print option is used for printing the document. The save and send option is used when you want to send the file via email or save it to the web, you can also save the file in PDF format using this option. The Help option gives all the help related to MS Word. Options commands give you all the advanced commands related to the document. The close option is used to close MS Word Application.
Home Tab:
Tabs are also called Menus. There are lots of submenus are present below Menus, they are also called groups.There are 5 Submenus/Groups present in the Home Tab which are as follows:
- Clipboard Group
- Font Group
- Paragraph Group
- Styles Group
- Editing Group
Let's talk about Each group in the Home Tab.
Clipboard Group:
The options available in the clipboard group are cut, copy, paste, and format painter. By using the cut option, you can cut the text in the document. With the help of a copy option, you can copy the text in the document. With the help of Paste the copied/cut text in the document. If you want to apply the format of one text to another text then you can use the Format Painter option.
Font Group:
The option available in Font Group are changing the font face, font size, Increase the font size, decrease the font size, change case, clear formatting, Bold, Italic, Underline, Strikethrough, Subscript, Superscript, Text effect, Text Highlight Color, and Font color.
By using the font face option, you can apply different styles to the text. With the help of the font size option, you increase or decrease the font size of the text. Same thing you can do with the increase and decrease font size option. With the help of the change case option, you can apply different cases to the text. If you want to clear the formatting of text then you can use the clear formatting command. With the help of Bold, Italic, Underline, Strikethrough, Subscript, and Superscript option you can apply bold, italic, underline, strikethrough, subscript, and superscript option to the text. You can give different text effects, highlight color, and Font with the help of Text effect, Text highlight color, and Font color Option.
Paragraph Group:
The Options available in the paragraph group are Bullets, Numbering, Multi-level list, Decrease Indent, Increase Indent, Sort, Show/Hide Paragraph Marks, Left Alignment, Center Alignment, Right Alignment, Justify Alignment, Line and Paragraph Spacing, Shading and Bottom borders.
You can give bullets with the help of the bullets option. You can give numbering with the help of the numbering option. You can create a multi-level list with the help of the multi-level list. You can increase or decrease the indent of text with the help of the increase and decrease indent command. If you want to show or hide paragraph marks then you can use the show/hide paragraph marks command. You can apply different alignment to the text with the help of alignment commands. You can adjust the spacing of lines and paragraphs with the help of the Line and Paragraph spacing command. You can apply different shading to the text with the help of the Shading command. You can apply different bottom borders with the help of the bottom border command.
Styles Group:
You can apply different styles to the text with the help of the styles group.
Editing Group:
The options available in the Editing group are Find, Replace and Select. You can find the text in the document with the help of the Find command. You can replace any text in the document with the help of Replace command. You can select any text in the document with the help of the Select command.
Insert Tab:
There are 7 submenus/groups present in Insert Tab which are as follows:
- Pages
- Table
- Illustrations
- Links
- Header and Footer
- Text
- Symbols
Let's talk about each group in Insert Tab.
Pages Group:
The commands available in the pages group are cover page, blank page, Page break. If you want to create the document with the ready-made format, here you have to type only the heading and subheading and your document are ready, you have to use the cover page command. If you want to insert a blank page at the cursor position then the blank page command is used. If you want to break a page from a certain line and start a document from the new page then the Page break command is used.
Tables Group:
With the table command, you can draw or add the table to the document.
Illustrations Group:
The options available in the Illustrations group are pictures, shapes, clip art, smart art, chart, and screenshot. The picture command is used to add pictures to the document. The shapes command is used to insert different shapes in the document. The clip art option is used to insert clip art in the document. The Smart art option is used to insert smart arts in the document. Chart option is used to insert different charts in the document. The screenshot option is used to capture a live screen in a document.
Links Group:
The options available in the Links group are Hyperlink, Bookmark, and Cross-reference. The hyperlink option is used to create the link to the web page or email or any image in a document. The bookmark option is used to create a bookmark in a document. Cross-reference is used to give reference to heading or tables in the document.
Header and Footer Group:
The options available in the Header and Footer group are the header, footer, and the page number. You can edit the header of the document with the help of the header option. The content you write on the header will display on each page of the document. Similarly, with the help of the footer option, you can edit the footer of the document. Content on the footer also displays on each page of the document. Page Number option is used to enter page numbers in the document.
Text Group:
The option available in the Text group are Text box, Quick parts, Wordarts, Drop cap, Signature line, Date and Time, and Object. You can add text boxes with the help of the Text box option. With the help of a quick part option, you can reuse the same lines in the document. With the help of the WordArt option, you can give different decorations to the text. With the help of a Drop cap, you can create a large capital letter at the starting of a paragraph like a newspaper. With the help of the signature line option, you can insert the signature line in the document. With the date and time option, you can add date and time in the document. With the help of the Object option, you can embed an image or different types of files in the document.
Symbol Group:
The option available in the symbol group is equation and symbol. You can add equations and symbols with the help of equation and symbol options respectively.
Page Layout Tab:
There are 5 submenus/groups present in Page Layout Tab which are as follows:
- Themes group
- Page setup group
- Page background group
- Paragraph group
- Arrange group
Let's talk about each group in detail.
Themes Group:
The commands available in the themes group are Themes, Colors, Fonts, Effects. You can give different designs with the help of a theme option. You can change the color of applied themes with the help of the color option. You can change the font of the applied theme with the help of the Font option. You can apply different effects to the applied theme with the help of the effects option.
Page Setup Group:
The commands available in the page setup group are margins, orientation, size, columns, break, line numbers, Hyphenation. You can apply different margin sizes with the help of the margins option. You can change the portrait or landscape orientation with the help of an orientation option. You can choose the different paper sizes for the documents with the help of the size option. With the help of the column option, you can split the text into columns. You can add a page, column, or section break with the help of the break option. You can add line numbers in the margin with the help of the Line numbers option. You can give hyphenation with the help of the hyphenation option.
Page Background Group:
The commands available in the page background group are Watermark, Page color, and Page borders.
You can give text behind the document with the help of the watermark option. You can change the background color of a page with the help of the Page color option. You can apply different borders with the help of the Page borders Option.
Paragraph Group:
The options available in paragraph groups are indent and spacing. You can adjust the indent and spacing with the help of the indent and spacing option respectively.
Arrange Group:
The options available in the arrange group are Position, Wrap text, Bring Forward, Send Backward, Selection pane, Align, Group and Rotate. You can adjust the position of the object with the help of the position option. If you want to place the text around the object the wrap text option is used. If you add more than one object in the document and you want that specific object to move forward then you can use the Bring Forward option. Similarly, you can move back object with the help of send backward option. To change the order of objects then the selection pane option is used. You can align the edges of objects with the help of the align option. You can group all the objects as a single object with the help of the group option. You can rotate the objects with the help of a rotate option.
References Tab:
There are 6 submenus/groups present in References Tab which are as follows:
- Table of contents
- Footnotes
- Citations and Bibliography
- Captions
- Index
- Table of Authorities
Let's talk about each submenu or group in detail.
Table of Contents:
The options available in this group are Table of contents, Add text, and Update table. You can add a table of content with the help of a table of content option. You can add text in the table of content with the help of add text option. You can update the table of content with the help of the update table option.
Footnotes:
The options available in the Footnotes group are Insert Footnotes, Insert Endnotes, Next Footnotes, and Show notes. You can add footnotes and endnotes with the help of the Insert Footnotes and Insert Endnotes option. You can navigate footnotes with the help of the Next Footnotes option. If you want to find out where the footnotes and endnotes are located, then you can use the Show notes option.
Citations and Bibliography:
The options available in this group are Insert citation, Manage sources, style, and bibliography. You can add citations with the help of a citation option. You can manage sources in the citation with the help of the manage sources option. You can add different styles to the citation with the help of style options. You can add a bibliography with the help of a bibliography option.
Captions:
The options available in this group are Insert caption, Insert table of figures, update table, and cross-reference. You can add a caption to the image with the help of the insert caption option. You can add a table of figures with the help of the table of figures option. You can update the table of figures with the help of the update table option. You can add cross-reference with the help of a cross-reference option.
Index:
The options available in this group are Mark Entry, Insert index, and Update index. You can include the selected text in the index of the document with the Mark Entry option. You can insert and update the document with the help of the Insert index and Update index option.
Table of Authorities:
The options available in this group are Mark citation, Insert table of authorities, and update table. You can add a selected text as an entry in the table of authorities with the Mark citation option. You can insert and update the table of authorities with the Insert table of authorities and update the table option.
Mailing Tab:
The groups available in this tab are as follows:
- Create
- Start Mail Merge
- Write and Insert Fields
- Preview Results
- Finish
Let's talk about each group in detail.
Create Group:
The options available in creating groups are Envelopes and Labels. You can create and print Envelopes and Labels with the Envelopes and Labels option.
Start Mail Merge Group:
If you want to send the same letter to different addresses then you will not create and send letters individually. There is a facility of Mail merge and in that facility, you can create a list of addresses and write a single letter and insert the address list and your work is done. You can use the Start Mail Merge group for that. The options available in this group start mail merge, select recipient, and Edit recipient list. You can start a mail merge with the start mail merge option. You can create a new address list or use an existing address list with the help of the Select recipient option. If you want to make changes in the address list then use the Edit recipient list option.
Write and Insert Fields Group:
The option available in these groups are Highlight merge fields, Address block, Greeting line, Insert merge field, Rules, Match fields, and Updates Labels.
Preview Results Group:
The options available in this group are Preview results, Find recipient, and Auto check for errors.
You can preview and find the results of a mail merge with the help of this group.
Finish Group:
You can final merge the letters in the document with the help of this option.
Review Tab:
The groups available in the review tab are as follows:
- Proofing
- Language
- Comments
- Tracking
- Changes
- Compare
- Protect
- OneNote
Let's talk about each group in detail.
Proofing Group:
The options available in the proofing group are spelling and grammar, research, thesaurus, and word count. You can check the spelling and grammar of the text in the document with the help of spelling and grammar options. You can research the research option. If you want to add other words with similar meanings then the thesaurus option is used. If you want to know the word count of the document then the word count option is used, the word count is also shown on the status bar of MS Word.
Language Group:
The option available in the language groups is Translate and Language. You can translate text and change the language with the Translate and Language option respectively.
Comments Group:
The option available in this group are New comments, Delete, Previous and Next. You can add a comment about the selected text with the new comments option. You can delete comments with the delete comment option. You can go to the previous or next comments with the help of the Previous and Next option.
Tracking Group:
The option available in this group is Track changes, Show markup and Reviewing pane. You can track the document with these options.
Changes Group:
The options available in this group are Accept, Reject, Previous and Next. You can make changes in the document with these options.
Compare Group:
You can compare or combine multiple versions of the document with this group.
Protect Group:
The option available in this group is to Block the author and Restrict editing. You can protect your document with these options.
OneNote Group:
You can create or open notes about documents.
View Tab:
The groups available in the view tab are as follows:
- Document views
- Show
- Zoom
- Window
- Macros
Let's talk about each group in detail.
Document views:
There ate a total of 5 document views which are Print layout, full-screen reading, web layout, outline, and draft.
Show:
You can check or uncheck the ruler, gridlines, and navigation pane here.
Zoom:
All zooming-related options are available in this group.
Window:
The options available in the window group are New window, Arrange all, split, View side by side, synchronous scrolling, reset window position, switch windows and macros.
Add-Ins Tab:
The groups available in this tab are Menu commands and custom toolbars.
I hope You will understand all the Menus and submenus in Microsoft office word.
I hope you understand these computer typing lessons. If you like this article, share this article with your friends. Thank You.


